It has been such a thrill to see my patterns show up on the pages of these British Cross Stitch Magazines. Cross Stitch Crazy was first to feature my pattern "Oberon" last fall, and just this month I discovered my "Yellow Butterflies" pattern was featured in the shopping guide of Cross Stitch Gold. Both magazines I highly respect - so I have to say thank you to the editors for selecting them.
There have been a few other milestones lately that have been exciting - I had my first sale to someone from my hometown. That was special, because one always wants to be recognized in the place that is most dear to one's heart. (That's Victoria, B.C.). I have been so excited to have customers from all over the world - Australia, New Zealand, Ireland, Scotland and England, Germany, Latvia, and even Russia! It makes me feel so cosmopolitan. It also makes the world feel that little bit smaller and friendlier.
I am coming up on my 100th order. I have sold more individual patterns than that, of course, but the 100th order will be a good marker. And I have learned so much since I began. I want to thank all of you who have been my customers - I have had such pleasure and joy starting this little etsy business - and connecting with all of you has a been a big part of that. Every time one of my patterns sells, I feel happy and excited. Thank you - it is truly a pleasure to share my passion and creativity with you.

Embroidery and biscornu patterns for a rainy day.
Friday, April 15, 2011

Tuesday, November 16, 2010
Freebie Pattern - By Small and Simple Things
This pattern was one of my earliest designs. The quote comes from Ben Jonson...
It is not growing like a tree
In bulk doth make man better be;
Or standing long an oak, three hundred year,
To fall a log at last, dry, bald, and sere:
A lily of a day
Is fairer far in May;
Although it fall and die that night,
It was the plant and flower of light.
In small proportions we just beauties see,
And in short measures life may perfect be.
I loved this poem as material for an embroidery project. Each small stitch is sweet and perfectly ordered. Things aren't always like that, but some moments in life can be exquisite and wonderful. To create and cherish something beautiful, however small, makes life a pleasure. I hope you enjoy the pattern - if you'd like to see more, visit me on Etsy - at Rainburst Embroidery.
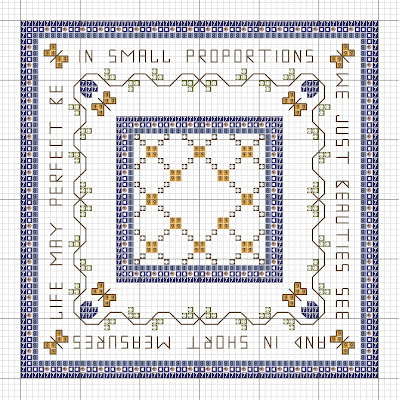

It is not growing like a tree
In bulk doth make man better be;
Or standing long an oak, three hundred year,
To fall a log at last, dry, bald, and sere:
A lily of a day
Is fairer far in May;
Although it fall and die that night,
It was the plant and flower of light.
In small proportions we just beauties see,
And in short measures life may perfect be.
I loved this poem as material for an embroidery project. Each small stitch is sweet and perfectly ordered. Things aren't always like that, but some moments in life can be exquisite and wonderful. To create and cherish something beautiful, however small, makes life a pleasure. I hope you enjoy the pattern - if you'd like to see more, visit me on Etsy - at Rainburst Embroidery.


Monday, September 20, 2010
Freebie Biscornu Pattern - Cherries
This cute summer pattern is a freebie! Use and share it with friends! The pattern is copyright of Rainburst Embroidery -Patterns are for personal use only. For more fun patterns, please see my etsy site - Rainburst Embroidery.

 |
| ©Rainburst Embroidery. |
Have fun with it! Click here for a printable PDF.
Monday, August 16, 2010
How to Make a Biscornu
Here is a basic tutorial for finishing a biscornu. Making these eight-sided little pincushions is easier than it looks. When you are done you will have an exquisite little treasure - a thing of beauty and a joy to hold. The model I have used in these photographs is called 'Stella by Starlight,' - the free pattern is now available here on my blog! Stella by Starlight Free Pattern.

1. Embroider two squares of equal size with the design of your choice. Then backstitch a square around each - in this example the squares are both 42 stitches by 42 stitches. This will become your whip-stitching edge - so anchor your threads firmly.
2. Cut backing fabric - at least 4 cm or 2 inches larger than the design area.
3. Pin the backing fabric to the embroidery.

4. Sew the backing fabric to your embroidery - place stitches within 1 cm of the whipstitching edge.
5. Trim each side - cut 1 cm outside the whip-stitching edge. Your backing fabric will still be attached.
6. You are now ready to join the two squares. Thread a blunt-ended needle with two strands of floss.

7. Come up at the corner of one square.
8. Pass your needle through the first stitch to the left.
9. Continue to pass your needle through either the first stitch to the left of center, if your sides have an even number of stitches, or the center stitch if your sides have an uneven number of stitches.

10. Bring the two sides together. Fold the excess fabric under and press the two backstitched lines together.
11. Continue to whipstitch to the left, matching one stitch to one stitch.
12. Your whip-stitched edge will start to look like this.

13. When you approach your first corner, prepare to turn.
14. Fold the excess fabric from the new side under.
15. Bring the bottom edge around to meet the new side.

16 and 17. Continue whipstitching.
18. When you come to your second corner, prepare to turn again.

19. Bring the two edges together as before.
20. Continue whip-stitching around the biscornu, turning each corner and matching stitch to stitch until six sides have been formed.
21. When two of the eight sides are left, stop to fill your biscornu.

22. Add batting to the inside of your biscornu.
23. Lavender can be added if desired. (This is my favorite thing to do with biscornu, because they smell wonderful when I pick them up.)
24. Finish with more batting. The biscornu should be firm, but not so tight that you can't create the characteristic dimple when you add your buttons later.

25. Continue whipstitching.
26. Turn your seventh corner, folding the edges into the biscornu.
27. When you come to the last stitch, discreetly knot the threads to finish.

28. Using a sharp needle and strong thread, add buttons or beads to the center of the biscornu. Pull firmly enough to create a dimple where your buttons or beads are placed. Knot it off securely.
29 and 30. You are finished! Isn't your work pretty? If you'd like to see more patterns for biscornu - visit me on Etsy - at www.RainburstEmbroidery.etsy.com.
Happy Stitching!
Caroline

1. Embroider two squares of equal size with the design of your choice. Then backstitch a square around each - in this example the squares are both 42 stitches by 42 stitches. This will become your whip-stitching edge - so anchor your threads firmly.
2. Cut backing fabric - at least 4 cm or 2 inches larger than the design area.
3. Pin the backing fabric to the embroidery.

4. Sew the backing fabric to your embroidery - place stitches within 1 cm of the whipstitching edge.
5. Trim each side - cut 1 cm outside the whip-stitching edge. Your backing fabric will still be attached.
6. You are now ready to join the two squares. Thread a blunt-ended needle with two strands of floss.

7. Come up at the corner of one square.
8. Pass your needle through the first stitch to the left.
9. Continue to pass your needle through either the first stitch to the left of center, if your sides have an even number of stitches, or the center stitch if your sides have an uneven number of stitches.

10. Bring the two sides together. Fold the excess fabric under and press the two backstitched lines together.
11. Continue to whipstitch to the left, matching one stitch to one stitch.
12. Your whip-stitched edge will start to look like this.

13. When you approach your first corner, prepare to turn.
14. Fold the excess fabric from the new side under.
15. Bring the bottom edge around to meet the new side.

16 and 17. Continue whipstitching.
18. When you come to your second corner, prepare to turn again.

19. Bring the two edges together as before.
20. Continue whip-stitching around the biscornu, turning each corner and matching stitch to stitch until six sides have been formed.
21. When two of the eight sides are left, stop to fill your biscornu.

22. Add batting to the inside of your biscornu.
23. Lavender can be added if desired. (This is my favorite thing to do with biscornu, because they smell wonderful when I pick them up.)
24. Finish with more batting. The biscornu should be firm, but not so tight that you can't create the characteristic dimple when you add your buttons later.

25. Continue whipstitching.
26. Turn your seventh corner, folding the edges into the biscornu.
27. When you come to the last stitch, discreetly knot the threads to finish.

28. Using a sharp needle and strong thread, add buttons or beads to the center of the biscornu. Pull firmly enough to create a dimple where your buttons or beads are placed. Knot it off securely.
29 and 30. You are finished! Isn't your work pretty? If you'd like to see more patterns for biscornu - visit me on Etsy - at www.RainburstEmbroidery.etsy.com.
Happy Stitching!
Caroline
Subscribe to:
Posts (Atom)